easiest way to create blogger template is by edit a template. But don't worry,
although this is a simple methods but it can produce a beautiful template, it
depend on how you design it. This tutorial is not to create blogger template
from beginning but this is to create template by editing a template. Ok lets
begin.
Before we begin I suggest you to create a new blog, I don't wont to destroy your
blog.
To follow this tutorial you have to download this template first.
downlad template.
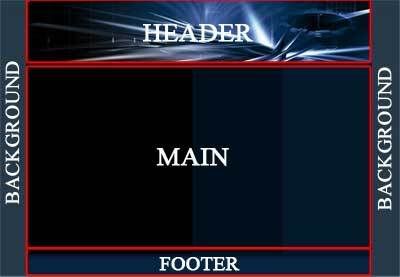
We will create a template that contain four main elements, (Background, Header,
Main and Footer) Like the image :
So you have to create the four elements, You can use Image editor software like
Adobe Photoshop, Corel Draw, Paint, etc.
Here's the detail to design it:
1. Create a design like above image.
2. On the background part it should be a Pattern/Tile.
3. Cut for every part (Background, Header, Main and Footer)
it should be like this :
background
header
main
footer
4. Upload your part image on the web hosting like geocities or on the image
hosting like photobucket.
All right, now we will arrange these part to the HTML.
1. Go to blogger then go to "EDIT HTML" menu.
2. Click on the "Brows" button to upload the template.
3. Find this code
body { margin: 0px; padding: 0px; text-align: left; font:$bodyfont;
color:$textcolor; background: #323232 url('http://blogoholic.info/files/bg.jpg')
repeat-x top left; }
4. Change the bold text with your image location
5. Then find this code, and change the bold text with your image location :
#center {background: #ffffff url('http://blogoholic.info/files/body.jpg')
repeat-y top center;}
6. Find the code below and change the bold text with your image location:
#header { margin: 0; height:196px;
width:898; color: $pagetitlecolor; background: url('http://blogoholic.info/files/head.jpg')
no-repeat top center; }
7. Find the code below and change the bold text with your image location:
#footer { margin: 0; width: 898px;
height:80px; padding: 0px; background: url('http://blogoholic.info/files/foot.jpg')
repeat-y top center; }
8. Now find the code below
#outer-wrapper { width: 898px;
margin: 0px auto 0; text-align: justify; }
this code width: 898px it's the width of your blog, change it according
to your image.
#main { float: left; width: 445px;
margin: 5px; padding: 0px 0px 0px 10px; line-height: 1.5em; word-wrap:
break-word; /* fix for long text breaking sidebar float in IE */ overflow:
hidden; }
This code width: 445px; is size/width of main, you can change it.
#sidebar { float: right; width: 153px;
padding-right: 50px; font-size: 83%; color: $sidebartextcolor; line-height:
1.4em; word-wrap: break-word; overflow: hidden; }
#ads-wrapper {float: left; width: 195px; padding-left: 10px; word-wrap:
break-word; overflow: hidden; }
This code width: 153px; is width of your right sidebar. and this code
width: 195px; is width your left sidebar. And this code padding-right:
50px; is gap of text on the right sidebar with right line. And this code
padding-left: 10px; is gap of text on the left sidebar with left line.
#header { margin: 0; height:196px;
width:898; color: $pagetitlecolor; background: url('http://blogoholic.info/files/head.jpg')
no-repeat top center; }
This code height:196px; width:898; is height and width of your header,
Change it according to your Header Image.
#footer { margin: 0; width: 898px;
height:80px; padding: 0px; background: url('http://blogoholic.info/files/foot.jpg')
no-repeat top center; }
This code width: 898px; height:80px; is width and height of your
footer.
9. Try to modify and preview it until looks good.
10. If it looks good you can save it.
Hope this article can help you.
credit to kendhin
No comments:
Post a Comment
Blog ini telah menggunakan do follow untuk link komen anda. Link anda akan tersenarai di search engine.